
Dorie Greenspan’s Cheese-Swirl Babka Buns
Published October 16, 2021
This article originally appeared at forward.com. Reposted with permission.
Dorie Greenspan, is the five-time James Beard Award-winning author of the delightful new cookbook, “Baking With Dorie.”
“Baking With Dorie” contains two babka recipes: a more-or-less classic one filled with cocoa and cinnamon and this sublime savory variety called Cheese-swirl Babka Buns. Both start with the same brioche dough (which is made a day in advance), but the latter involves four kinds of cheese — ricotta, cream cheese, parmesan, and either cheddar or gruyere — along with chives and shallots, and gets a sprinkling of cheesy streusel that takes the whole thing entirely over the top.
Makes 8 buns

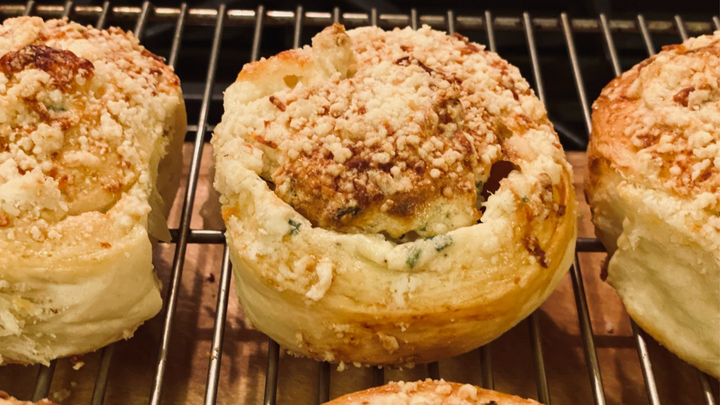
Made with brioche dough, rolled up and cut like sticky buns and reminiscent of cheese Danish, these are sweet babka’s flip side. The filling is a mix of ricotta and cream cheese, shallots and chives. You can play around with the flavorings, but make sure to add the cubes of hard sharp cheese—they’re there for both taste and texture. Just before the buns are slid into the oven, they’re covered with streusel, a crunchy crown. But here the streusel is salty and cheesy, a crisp echo of the filling. Make these for a special brunch or serve them when lunch is a salad. And while they’re best just baked, they make a really good breakfast the next day.
PLAN AHEAD: The babka buns start with brioche dough (see below), which you’ll need to make a day ahead.
FOR THE FILLING
½ cup (125 grams) ricotta
2 ounces (65 grams) cream cheese, softened
2 tablespoons finely chopped shallots or onion, rinsed and patted dry
2 tablespoons minced fresh chives or scallion greens
1 tablespoon finely grated Parmesan
¼ teaspoon fine sea salt, or to taste
Pinch of freshly ground pepper
5 tablespoons (60 grams) tiny-cubed Comté, Gruyère or cheddar
½ recipe dough for Brioche (see below), chilled and ready to shape
FOR THE TOPPING
1 large egg, lightly beaten with 1 teaspoon cold water, for glazing
¼ cup (30 grams) chopped almonds or walnuts (optional)
1 tablespoon finely grated Parmesan (optional)
½ recipe Cheddar Streusel (see below)
TO MAKE THE FILLING: Mix everything except the cubed cheese together. Taste for salt and pepper, then stir in the cheese. Cover and refrigerate until needed. (The filling can be refrigerated for up to 2 days.)
TO MAKE THE BUNS: Generously butter a 9-x-13 inch baking pan. Lightly flour a work surface. Shape the cold dough into a rectangle and dust the top with flour. Roll into a 12-x-14-inch rectangle, flipping the dough so that you work on both sides and sprinkling the dough or work surface with more flour as needed. Dab the filling over the dough and, using an offset spatula (or a butter knife or the back of a spoon), spread it evenly over the dough, leaving an inch or so bare on one long side.
Starting with the long side that has filling, roll the dough up as compactly as you can, ending with the seam on the bottom. (If the dough is soft and difficult to work with, you may want to chill it for a bit before cutting it.) Cut away the ends of the log if they look ragged and perhaps a little low on filling. Then, using a chef’s knife, slice the log into 8 buns, about 1½ inches wide (it’s fine if they’re slightly bigger or smaller). Place them spiral side up in the baking pan. You’ll have a lot of space between the buns, and that’s just as it should be.
Lightly cover the pan with a piece of parchment and put it in a warm place. You want the buns to double in volume, feel soft and light and touch one another here and there. Be patient—depending on the warmth of your room, this can take up to 2 hours, maybe a little more.
GETTING READY TO BAKE: When the buns are almost fully puffed, center a rack in the oven and preheat it to 375 degrees F.
Remove the parchment and gently brush the top of each bun with beaten egg white. If you’d like to add the nuts and/or Parmesan to the streusel topping, now’s the time. Scatter the streusel over the buns—if you think it needs it, pinch the streusel as you scatter so that you’ve got little nuggets.
Bake for 30 to 35 minutes, or until the buns are golden brown and puffed—they may bake into one another, and that’s nice. Transfer the pan to a rack and let rest for 5 minutes or so before lifting the buns onto the rack. They’re ready to eat when they’re warm or at room temperature.
STORING: The buns are best the day they’re baked, but they’ll be good the following morning; wrap them well. If you’d like, reheat them in a 350-degree-F oven (or microwave them for about 20 seconds). You can freeze the baked buns, well wrapped, for up to 2 months (rewarm them when they defrost), but it’s better to freeze the filled and rolled dough or the cut buns. Defrost overnight in the fridge, slice into buns, if necessary, place in the buttered pan and let rise, which will take longer; glaze and cover with the topping, then bake.
Brioche Dough
2 sticks (8 ounces; 226 grams) unsalted butter, taken out of the refrigerator
15 minutes ahead of time, plus softened butter for the top of the dough
3½ cups (476 grams) all-purpose flour
¼ cup (50 grams) sugar
1 ½ teaspoons fine sea salt
4 teaspoons instant yeast
⅓ cup (80 ml) milk, at room temperature
⅓ cup (80 ml) water, at room temperature
3 large eggs, at room temperature, lightly beaten
1 large egg, beaten with a splash of cold water, for glazing
ONE DAY AHEAD: Butter a container with a capacity of at least 3 quarts or a large bowl. Have a tablespoon or so more of softened butter at hand.
Put the flour, sugar and salt in the bowl of a stand mixer and, using a spoon or flexible spatula, stir to blend. Stir in the yeast. Attach the bowl to the mixer stand and fit it with the dough hook. Stir the milk and water together in a bowl and, with the mixer on medium-low, gradually add the liquid to the flour mixture. When it’s all in, scrape the bowl and then mix on medium for 2 to 3 minutes, until you’ve got a bowl of shaggy bits of dough. It won’t look good, but things will improve.
Working on medium-low, gradually pour in the eggs. When they’re in, increase the speed to medium (or a notch higher) and beat for about 5 minutes, scraping the bowl now and then. For a few minutes, the mixture will slosh around and you’ll think it’s a failure—just keep mixing! When the eggs are fully incorporated, the dough still won’t be pretty, but it will spin around on the hook and although it will pool at the bottom of the bowl, it will clean the sides.
Keep the mixer at medium and start adding the butter a small piece at a time. I usually squish the butter between my fingers as I add it. Add it slowly, so that you don’t have more than 2 pieces visible at the same time. This can take a while, maybe 10 minutes or so. When all the butter is in, increase the mixer speed to a bit higher than medium and beat for about 10 minutes: Stay close to the mixer—it might crawl or jump while it’s beating! Scrape the bowl and hook occasionally, beating until the dough comes together in a soft, smooth, glossy mass; when you reach into the bowl and pull the dough, it will stretch, not break.
Scrape the dough into the buttered container or bowl and press it down so that it’s smooth; rub a little softened butter over the top of the dough. Cover with a kitchen towel, put it in a warm place and let the dough rise until it’s doubled in size, 45 minutes to 1 hour (it might take more or less time, depending on the temperature of the room and the dough—go by volume, not time).
When the dough has risen, lift up four corners one at a time and let the dough fall back into the container, or fold the dough over on itself; smooth the top. Cover the container and put it in the fridge. After 30 minutes, lift the dough with your fingers—work around the dough so that you get to all of it— and let it fall. Do this every 30 minutes until it is cold, firm and no longer rising significantly, about 2 hours. Cover the dough with plastic wrap, pressing it directly against the dough, then cover the container and leave the dough in the refrigerator overnight. (The dough can be refrigerated for up to 2 days.)
Cheddar Streusel
Makes about 1½ cups
¾ cup (102 grams) all-purpose flour
2 teaspoons sugar
½ teaspoon fine sea salt
5½ tablespoons (2½ ounces; 78 grams) very cold unsalted butter, cut into small pieces
¼ cup (20 grams) shredded sharp cheddar (see below)
Whisk together the flour, sugar and salt in a medium bowl or the bowl of a stand mixer. Drop in the cubes of cold butter and toss the ingredients together with your fingers until the butter is coated.
TO MIX THE STREUSEL BY HAND: Squeeze, mush or otherwise mash, rub and press everything together until you have a bowl of moist clumps and curds. You’ll know it’s ready when you can pinch the streusel and it holds together. Stir in the cheese.
TO MAKE THE STREUSEL WITH A STAND MIXER: Attach the bowl to the mixer stand, fit it with the paddle attachment and mix on medium-low speed until the ingredients form moist, clumpy crumbs. Pinch the streusel, and it should hold together. Reaching this stage may take longer than you’d expect, so hold on. Add the cheese. Pack the streusel into a covered container and refrigerate for at least 1 hour. When you’re ready to use the streusel for a topping, pinch off pieces of varying sizes.
STORING: Stored in a ziplock bag (squeeze out as much of the air as you can) or a sealed container, the streusel will keep in the refrigerator for up to 2 weeks. Packed airtight, it can be frozen for up to 2 months; thaw in the refrigerator.